Root Cause Analysis Diagrams, Templates — and How to Verify the Fix Actually Worked
Root cause analysis (RCA) is the family of structured techniques used to identify why a problem occurred — not just what happened, but why the system produced that outcome. This page gives you three ready-to-use diagram types (fishbone, 5 Whys, fault tree) and a free blank template. Most guides to RCA stop there — diagram drawn, causes listed, job done. This one goes further: finding the root cause is necessary but not sufficient. The fix has to operate at the right level of the system, and it has to be verified with data, not assumed. Two fully worked examples, drawn from real NHS incident data, show what that looks like end to end.
Related: 5 Whys guide · Never Events worked example · Joiner levels of fix · Moonshot Protocol
A fishbone diagram or 5 Whys chain gives you a candidate cause. Before you close the investigation, four separate checks need to pass — and RCA guides typically stop after the first one:
- Right cause? Is this actually the root cause — or a comfortable stopping point? See Making the Invisible Visible for the Iceberg model that checks whether you’ve reached Mindset, or stopped at Structure.
- Right intervention? Is the fix pitched at the level the cause actually sits at? See Joiner’s Levels of Fix — a Level 3 cause needs a Level 3 fix, not a Level 1 patch.
- Right measure? Are you tracking the measure that will actually tell you? See Types of Measures for process vs outcome measures, Leading Indicators for choosing what to watch when the outcome is years away, Gaming the Measure for why a single-point target gets gamed, and Bright Spots for what a genuine positive outlier looks like.
- Right analysis — did it work? See Interpreting StepChange Analyzer Output to run the outcome measure through Bootstrap CUSUM rather than assuming the fix landed, Tampering & Impatience for why reacting to normal noise makes things worse, and False Alarms in Performance Charts for telling a genuine signal from common cause variation.
- Draw a fishbone (Ishikawa) diagram for any healthcare QI problem, using the free blank template.
- Choose between fishbone, 5 Whys, fault tree, and other tools — and know when each works best.
- Build a cause map that reaches system causes (not just “human error”).
- Handle psychological “why” questions honestly (fear, hierarchy, incentives) without blame.
- Close the loop: verify with data whether the fix actually changed the outcome.
↓ Jump straight to the blank fishbone template · or the completed NHS example · or why RCA frequently fails in the NHS
☰ Contents — click to expand
- What root cause analysis is
- The RCA tool family
- The fishbone (Ishikawa) diagram
- Blank fishbone template
- NHS example 1 — wrong-route medication error
- NHS example 2 — delayed discharge
- The 5 Whys diagram
- Fault tree diagram
- Which tool or diagram to use when
- Finding the root cause is necessary but not sufficient
- Psychological “Why” frameworks
- RCA in the NHS — why it frequently fails to prevent recurrence
- Moving from diagram to system cause
- From cause map to structural fix
- Closing the loop with data
What root cause analysis is
Root cause analysis is a structured investigation methodology applied after an adverse event, near-miss, or persistent problem. Its purpose is to identify the fundamental cause — the root cause — that, if addressed, would prevent recurrence. Not the proximate cause (what immediately triggered the event), not the contributing factors (what made it worse), but the underlying condition that made the event possible.
The distinction matters because most organisations respond to problems at the proximate cause level. A patient falls: the immediate response is to put up the bed rails. A medication error occurs: the immediate response is to retrain the nurse. These responses address the proximate cause — they may prevent this specific event in this specific way, but they leave the underlying condition unchanged. The next event of the same type will occur through a slightly different proximate cause, and the cycle repeats.
Proximate cause: The immediate trigger of the event. What happened just before the adverse outcome. A necessary but not sufficient explanation — it tells you the mechanism but not the cause.
Contributing factor: A condition that increased the likelihood or severity of the event but did not directly cause it. Fatigue, understaffing, poor lighting, time pressure. Important context but not the root cause.
Root cause: The fundamental system condition without which the event either could not have occurred or would have been far less likely. Addressing the root cause prevents recurrence of the entire class of events, not just this specific instance.
The RCA tool family
Several complementary tools exist for root cause analysis. Each is suited to different types of problems and different organisational contexts.
The 5 Whys
Ask why five times to trace a linear causal chain from symptom to root cause. Simple, fast, requires no special equipment. Developed by Toyota.
Fishbone (Ishikawa) Diagram
Maps multiple categories of potential causes onto a diagram shaped like a fishbone, with the problem at the head. Developed by Kaoru Ishikawa at Kawasaki in the 1960s.
Fault Tree Analysis (FTA)
Top-down logical diagram that maps all possible combinations of failures that could produce an undesired top event. Uses Boolean logic gates (AND, OR). Standard in aerospace and nuclear industries.
Significant Event Analysis (SEA)
A reflective, team-based review of significant events — including near-misses and good outcomes — to learn from what happened. Standard in UK primary care.
The Moonshot Protocol
A three-phase, ten-step process for the cases where the four tools above correctly identify a cause, but the fix has never stuck because two requirements appear to conflict. Dissolves the contradiction with TRIZ separation rather than compromising.
The fishbone (Ishikawa) diagram
The fishbone diagram — also called the Ishikawa diagram or cause-and-effect diagram — was developed by Kaoru Ishikawa at Kawasaki Heavy Industries in the 1960s and is now used across healthcare, manufacturing, and service industries worldwide. The diagram looks like a fish skeleton: the problem (effect) is the head; the bones are categories of causes; the sub-bones are specific causes within each category.
The 6M categories
The most widely used fishbone structure in manufacturing and healthcare uses six categories — the 6Ms. In healthcare the categories are sometimes adapted to the 4Ps (People, Process, Place, Policy) or to specific clinical frameworks.
| Category | Manufacturing original | Healthcare equivalent | Examples of causes |
|---|---|---|---|
| Man / People | Operator skills, training | Staff knowledge, fatigue, communication | Insufficient training, unclear roles, handover failures |
| Machine / Equipment | Tools, machinery | Medical devices, IT systems, connectors | Equipment not available, alert fatigue, incompatible connectors |
| Method / Process | Procedures, work instructions | Clinical protocols, care pathways | No standard procedure, procedure not followed, outdated guideline |
| Material | Raw materials, components | Medications, supplies, patient information | Look-alike/sound-alike drugs, missing information, supply chain failures |
| Measurement | Inspection methods | Monitoring, audit, reporting | No monitoring system, measurement error, metric not tracked |
| Mother Nature / Environment | Temperature, humidity | Ward culture, staffing levels, time pressure | Understaffing, interruptions, normalisation of deviance |
Blank fishbone template
Each bone = a category of causes. Sub-branches (dashed) = specific causes within that category. The problem (effect) goes in the head box on the right.
- Write the problem clearly in the head box — be specific. “Delayed discharge” is better than “flow problems.” “Wrong-route medication administered to patient X on ward Y” is better than “medication error.”
- Brainstorm causes in each category — write on the sub-branches. Include everything that might be contributing, not just the obvious ones.
- Ask “why?” at least twice for each cause — the first answer is usually a symptom. The second or third answer starts to reach the system.
- Circle the root causes — the causes that, if addressed, would prevent recurrence. These are usually in Management, Environment, or Process — not in People.
- Verify with data — the diagram generates hypotheses. Bootstrap CUSUM on the outcome metric after the fix confirms whether a hypothesis was correct.
NHS example 1 — wrong-route medication error (never event)
The root causes (RC) are in Management — incomplete NRFit rollout and absence of a mandatory double-check policy. People and Environment contributed but are not root causes: addressing them alone would not prevent recurrence.
The most common mistake in RCA is stopping at the person. “Locum unfamiliar with ward” describes a contributing factor but not the root cause. The root cause question is: what system feature allowed a locum unfamiliar with the ward to administer medication via the wrong route without any check catching it?
The answer is in Management: NRFit connectors — which make wrong-route administration physically impossible — had not been fully rolled out, and no mandatory independent double-check policy existed. Address the system, and it doesn’t matter whether the nurse is familiar with the ward or not.
See Never Events: Wrong-Route Medication for the full Bootstrap CUSUM analysis of whether NHS Never Event programmes have produced structural change.
NHS example 2 — delayed discharge
Two constraint types visible: internal (Process, Management) and external (System boundary — social care). Addressing only internal causes will improve flow but not eliminate the external constraint. See Gloucestershire Bright Spot for how both were addressed simultaneously.
The 5 Whys diagram
The 5 Whys is a linear cause chain: you ask “why?” repeatedly until you reach the root cause. It is simpler than the fishbone and works well for straightforward single-cause problems. It works less well for complex multi-cause problems where several independent chains lead to the same outcome — a fishbone handles these better.
The 5 Whys traces one causal chain. The root cause is a management system failure (no executive accountable), not a human error.
Fault tree diagram
The fault tree diagram works top-down: starting from the failure event, it maps the combinations of conditions that could produce it using AND/OR logic gates. It is most useful for safety-critical systems where you need to identify all possible pathways to a failure, not just the most likely one. In healthcare, it is used in FMEA (Failure Mode and Effects Analysis) and safety case development.
For most QI improvement work, the fishbone or 5 Whys is more practical. Use fault tree analysis when you need to be exhaustive about failure pathways rather than when you need to identify the single most important cause.
Which tool or diagram to use when
Not every recurring problem warrants a full investigation. The rule of three is the practical trigger for deciding whether to log and watch, run a light check, or commit to the full structural process below — including, where the cause turns out to be a deep structural contradiction, the Moonshot Protocol.
- First occurrence: Observe and log. Apply a Joiner Level 1 containment fix if needed. Do not launch a full investigation — this may be special cause variation, a one-off.
- Second occurrence: Preliminary audit — run 5 Whys steps 1–2 only. Check whether the two events share the same structural trigger.
- Third occurrence: Common cause confirmed. The system is producing the event. Launch a full structural investigation — the fishbone or 5 Whys techniques above, and if a genuine contradiction is blocking the fix, the Moonshot Protocol.
Why three? A special cause happens once. When it happens three times, it is no longer an accident — it is a feature of the system design. You now have enough data to show that this is a structural failure, not bad luck.
| Situation | Recommended tool | Why |
|---|---|---|
| Single adverse event with a clear sequence of events | 5 Whys | Fast, simple, follows the causal chain directly |
| Complex event with multiple contributing causes across different departments or systems | Fishbone diagram | Organises brainstorming across categories; prevents fixating on one cause; good for team sessions |
| Recurring pattern of similar events across multiple sites or time periods | Bootstrap CUSUM + RCA | CUSUM identifies the pattern and dates it; RCA explains the cause |
| Safety-critical system where all failure pathways must be mapped | Fault tree analysis | Systematic, quantifiable, maps all pathways including combinations; used in FMEA |
| Learning from near-misses in primary care or community settings | Significant Event Analysis | Reflective format, culturally accessible, covers positive events too |
| Want to show causal loops and feedback (systemic problems) | Causal Loop Diagram | Shows reinforcing loops; better for recurring system problems. See Causal Loop Diagrams |
| Contradictions keeping the problem in place | Evaporating Cloud | Reveals the assumption sustaining the conflict. See Evaporating Cloud |
Finding the root cause is necessary but not sufficient
Root cause analysis is widely assumed to lead naturally to prevention. Find the cause, fix the cause, prevent recurrence. In practice the chain frequently breaks at the third link. Two specific failures account for most of this.
The fix operates at the wrong level. The RCA correctly identifies the root cause at the system level. The fix is implemented at the process or output level because the system-level fix is too expensive, too slow, or outside the authority of the team conducting the analysis. The root cause remains unchanged. The event recurs through a different proximate cause. Another RCA is conducted. The pattern repeats. Joiner’s Levels of Fix is the diagnostic tool for this failure: if the fix is at Level 1 or Level 2 but the root cause is at Level 3, the fix will not prevent recurrence.
The fix is never verified. The fix is implemented and assumed to work. No pre-specified outcome measure was defined before the fix. No Bootstrap CUSUM prediction was made. When the next review occurs, the team reports that the action was completed — not that the outcome changed. Completing an action and changing an outcome are not the same thing. Without a pre-specified test, the improvement is asserted rather than confirmed.
A Never Event occurs. An RCA is conducted. A corrective action plan is produced. The actions are completed and signed off. The event occurs again the following year. Another RCA is conducted. The same root causes are identified. A similar action plan is produced. This cycle, documented in multiple NHS investigations, is the direct consequence of RCA without Joiner-level awareness and without Bootstrap CUSUM verification. The root cause is found, a Level 1 or Level 2 fix is applied, the system remains unchanged, and the event recurs. Bootstrap CUSUM on NHS Never Events data shows the result: 17.5 events per year, unchanged for 15 years, across thousands of individual RCA investigations.
A widely repeated diagnosis of NHS emergency care holds that the constraint sits in social care discharge capacity — beds occupied by patients medically ready to leave but with nowhere to go. That data point is real and well-documented. But it is also a plausible, externally-located cause of exactly the kind this page has been warning about: comfortable to state, outside the hospital's own authority to fix, and easy to stop investigating at. Bright Spot analysis of trusts that have reduced corridor care suggests a meaningful share of delay sits inside the hospital’s own processes — diagnostic turnaround, medication rounds, weekend staffing, internal discharge planning — before a patient ever becomes a social-care problem. Neither explanation is settled; both may be true simultaneously. The point is procedural, not factual: a plausible cause is not the same as a verified one, and the same discipline this page applies to a fishbone diagram applies to a policy diagnosis. See NHS A&E: Why Nothing Has Worked for the fuller Theory of Constraints analysis this example is drawn from.
Psychological “Why” frameworks — why people ask why differently
The 5 Whys is a logical technique. But the question “why?” also has a psychological dimension that determines whether an RCA reveals the true root cause or a socially acceptable one.
In organisations where fear is present — where pointing out problems or naming system failures carries personal risk — the 5 Whys produces a sanitised causal chain that stops at the level where blame becomes uncomfortable. The questioning process appears rigorous. The conclusions are systematically incomplete. The real root cause — the management system, the accountability structure, the incentive that produced the behaviour — is never named because naming it carries too high a personal cost.
Psychological safety is not a pre-condition for asking why. It is a pre-condition for the answers being honest. Amy Edmondson’s research on psychological safety in healthcare teams showed precisely this: teams with low psychological safety reported fewer errors, not because they made fewer errors, but because they were less willing to report them. RCA conducted in conditions of low psychological safety produces fewer root causes found, not because there are fewer root causes, but because the investigation stops before reaching the ones that are uncomfortable to name.
This is why Going to the Gemba is a pre-condition for honest RCA in complex organisations: the senior person who goes to where the problem manifests, in a culture of psychological safety, hears what the front line actually knows — not what the front line thinks it is safe to say. Deming’s Point 8 (drive out fear) is not a management philosophy. It is a prerequisite for root cause analysis to reach the root.
RCA in the NHS — why it frequently fails to prevent recurrence
The NHS conducts thousands of Root Cause Analyses every year through the Serious Incident framework, the Patient Safety Incident Response Framework (PSIRF), and clinical audit processes. The volume of RCA activity is not in question. The effectiveness is.
Three structural features of NHS RCA produce the recurring-event pattern:
1. Individual event focus without pattern analysis. Each RCA analyses one specific event. The systemic pattern — that the same type of event recurs at the same rate year after year — is visible only when multiple events are analysed as a series. Bootstrap CUSUM on the series answers the question that individual RCA cannot: has the rate of this type of event structurally changed? If it has not, the individual RCAs have not produced system change.
2. Action completion measured, not outcome change. NHS governance frameworks typically require trusts to report that RCA actions have been completed. They do not require trusts to demonstrate that completing those actions changed the outcome. The accountability framework measures activity, not effect. This is precisely the process measure vs outcome measure confusion: completing an action plan is a process measure. Reducing the event rate is an outcome measure. The NHS reports the former and calls it improvement.
3. PSIRF and the shift away from RCA as the default. The Patient Safety Incident Response Framework (2022) does not merely supplement RCA — NHS England's own policy team has stated plainly that “methods that assume simplistic, linear identification of a single cause (i.e., Root Cause Analysis) are no longer recommended” as the default response. PSIRF instead promotes a range of system-based methods (SEIPS, FRAM, HFACS) that examine how people, process, technology, and environment interact — because a single-cause model frequently stops at a plausible answer before reaching the real one. This is the official NHS diagnosis of the exact failure mode described above. The analytical tool that makes system-level pattern analysis rigorous — Bootstrap CUSUM applied to the event series — is not yet routinely used within it. See the PSIRF Analytical Framework for how RCA, pattern recognition, and structural verification fit together inside that wider response framework.
| Framework | Where it comes from | What it forces you to check |
|---|---|---|
| SEIPS Systems Engineering Initiative for Patient Safety |
Healthcare human factors research (Carayon et al.); the framework PSIRF specifically encourages | How five components — person, tools/technology, organisation, environment, and task — interacted at the moment of the incident. Errors are treated as arising from the work system, not the individual acting alone. |
| FRAM Functional Resonance Analysis Method |
Safety science (Erik Hollnagel); used across aviation, energy, and healthcare | How everyday, normal adjustments people make to keep work running — not a single broken step — can unexpectedly combine across different parts of the system to produce an unwanted outcome. |
| HFACS Human Factors Analysis and Classification System |
Aviation accident investigation; adapted for healthcare | Whether the cause traces upward through four levels — the unsafe act itself, preconditions for it, supervisory factors, and organisational influences — rather than stopping at the frontline action. |
All three share the same underlying discipline as Joiner's Levels of Fix: resist stopping at the first cause that is comfortable to name, and keep checking sideways, across time, or upward through the organisation before calling an investigation complete.
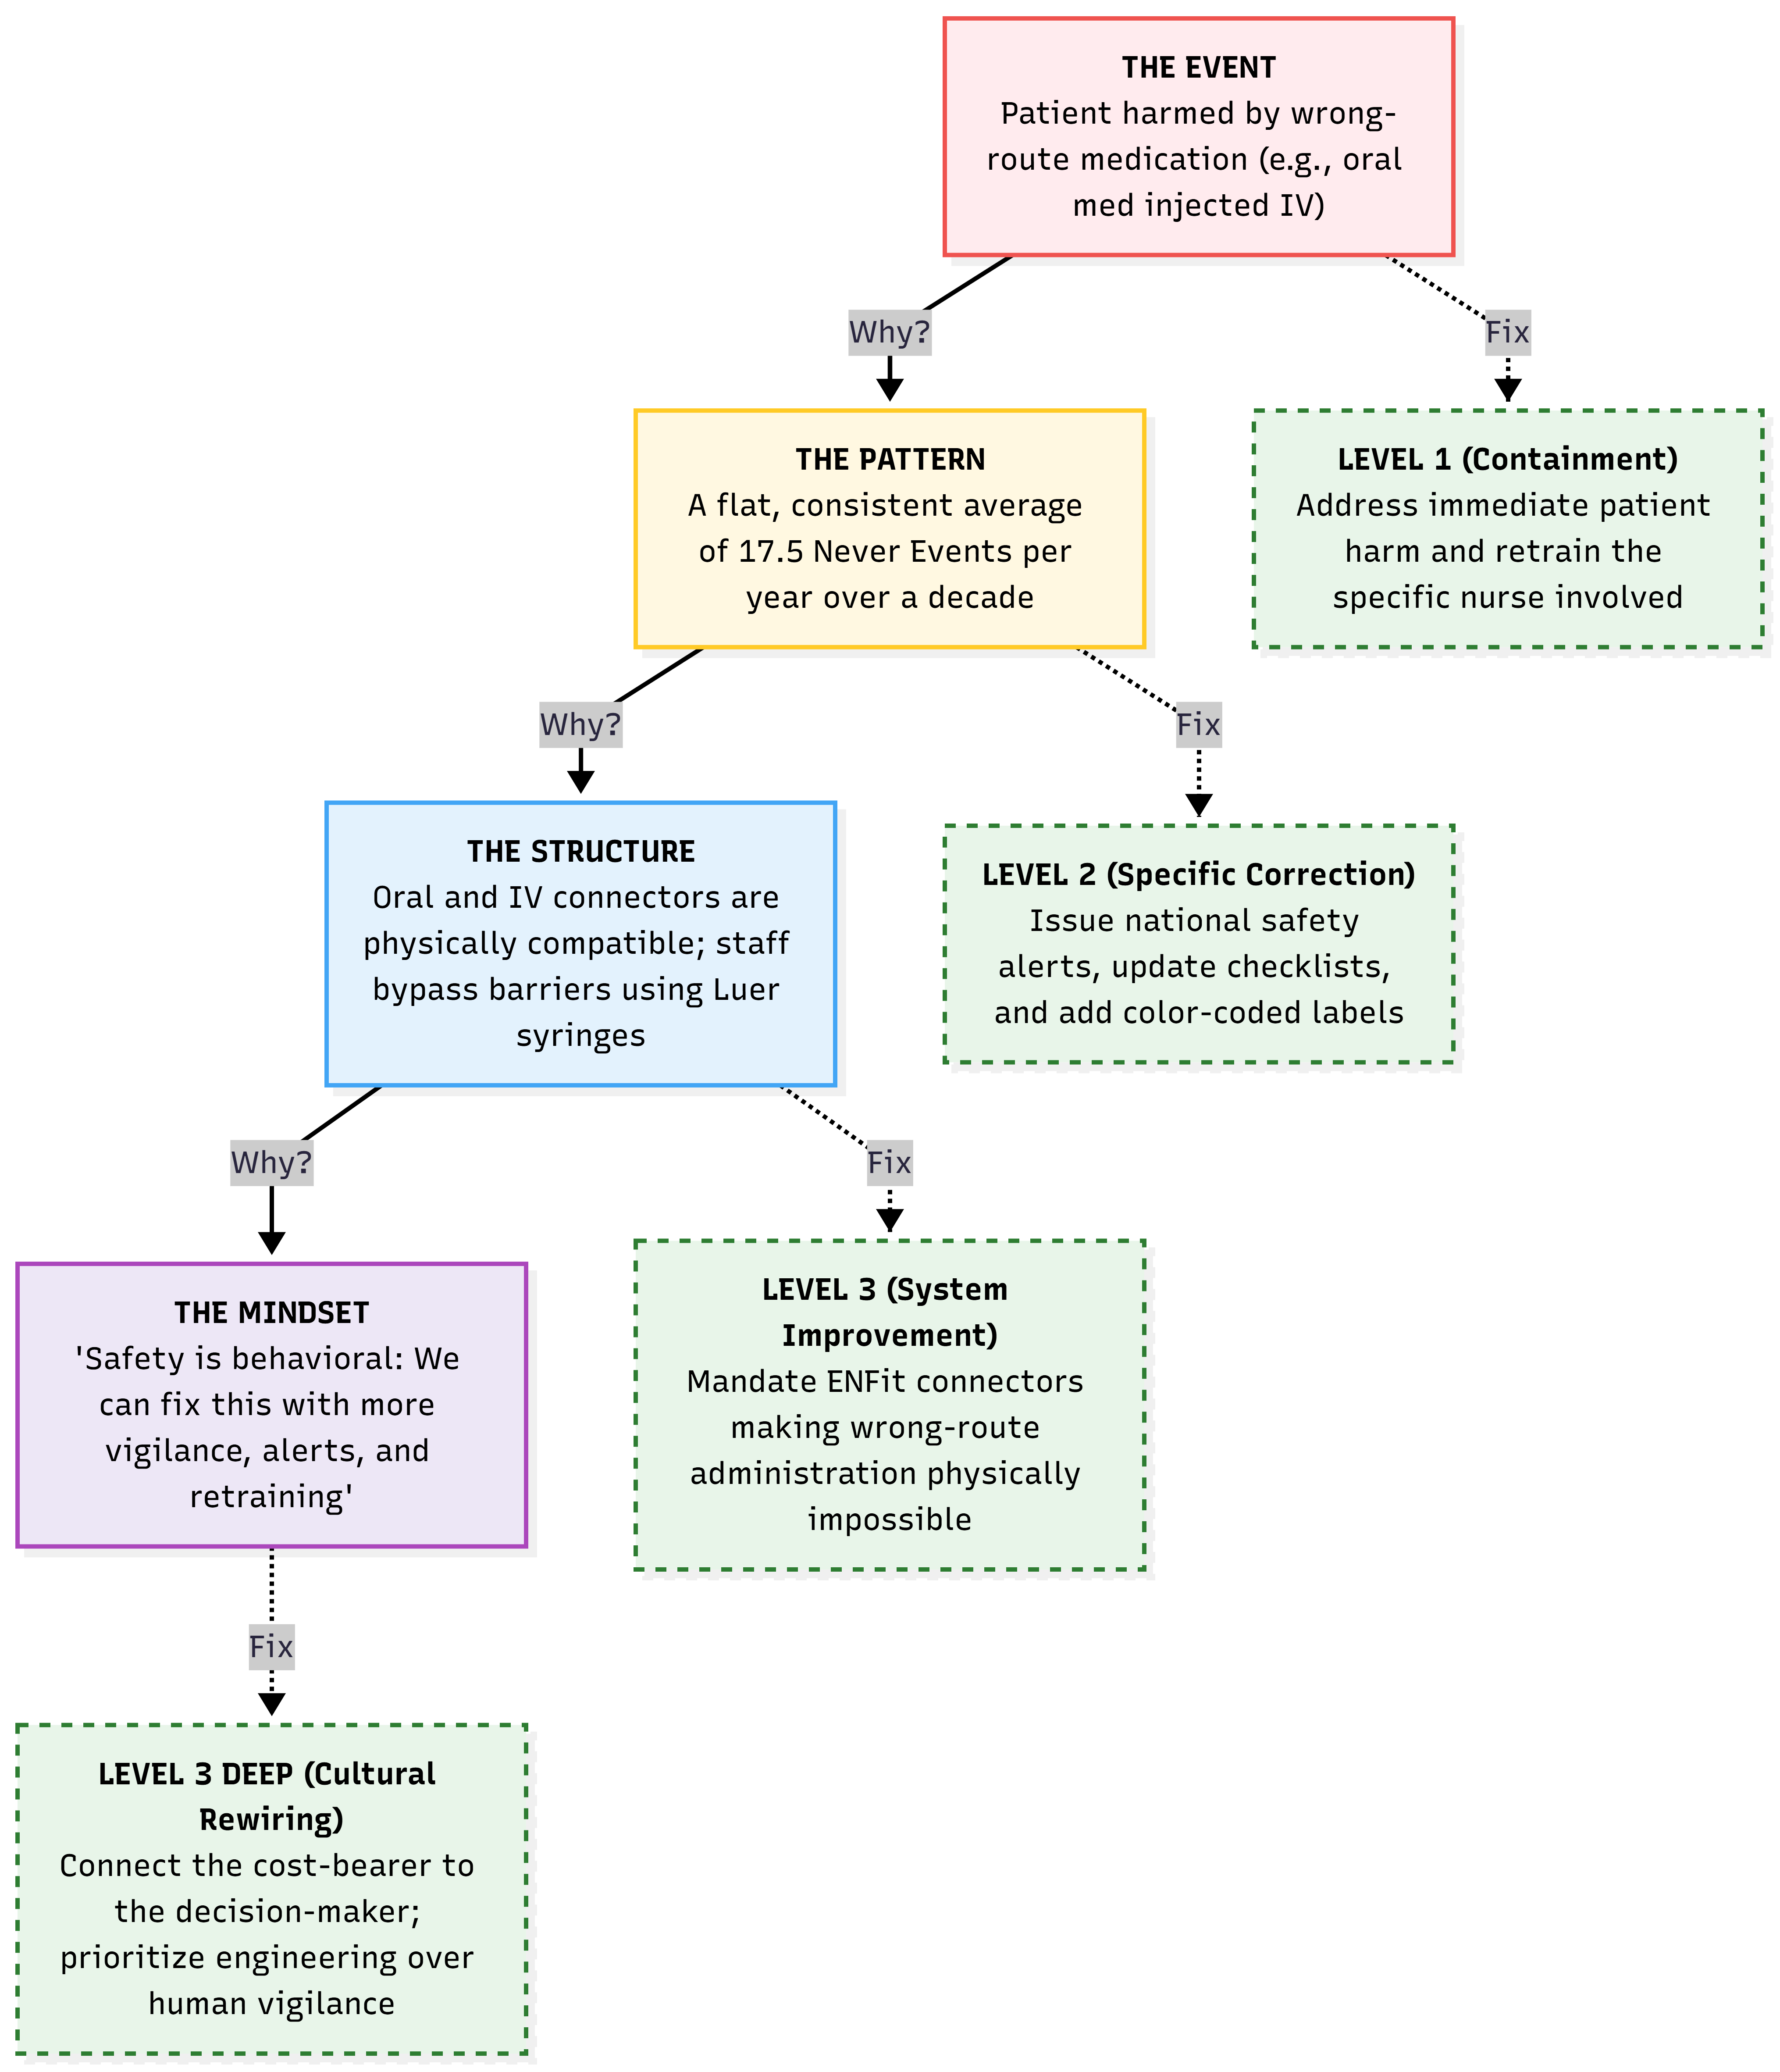
The wrong-route Never Event traced through the Senge Iceberg. The reactive loop (dashed arrow) returns to the Structure level but never reaches the Mindset. Without challenging the belief that “safety is behavioural,” the event rate stays flat at 17.5 per year regardless of how many investigations are conducted. See the Moonshot Protocol for another type of RCA template — the full ten-step method for reaching and dissolving the Mindset level.
Moving from diagram to system cause
The most important rule in any RCA diagram: keep asking why until you reach a system cause, not a person cause. Most diagrams stop too early — at the action of an individual rather than at the system feature that allowed or produced that action.
A system cause is one that:
- Would produce the same outcome with a different person in the same situation
- Can be changed by a management or design decision rather than by training or supervision
- Is in the Management, Process, or Equipment categories — not in People
People causes (tiredness, distraction, unfamiliarity) describe human vulnerability to a system design failure. They are real contributing factors. They are not root causes — because addressing them without changing the system means the next person in the same situation faces the same risk.
From cause map to structural fix — the Moonshot Protocol
Drawing the fishbone diagram is Step 2 of improvement — seeing the structure. But most QI programmes stop there: the diagram is produced, the causes are listed, an action plan is written, the same event recurs. The reason is that RCA rarely reaches the structural assumption that is keeping the problem in place.
The Moonshot Protocol takes the fishbone forward into structural change — a three-phase, ten-step process for naming the contradiction behind a recurring problem and dissolving it with TRIZ separation, rather than compromising on it. It includes a full worked example using the wrong-route medication Never Event case, the rule of three for deciding when a full structural investigation is warranted, and the Bootstrap CUSUM pre-committed prediction for verifying the fix actually worked.
Read the full Moonshot Protocol →
Closing the loop with data
A fishbone diagram, 5 Whys chain, or fault tree generates hypotheses about what caused the problem. None of them prove which cause was the binding one. Only data can do that — which is why this is Step 4 of the five-step improvement framework: test honestly. The diagram is Step 2 (see the structure) and Step 3 (challenge the assumption); Bootstrap CUSUM closes the loop.
📊 The complete RCA + Bootstrap CUSUM cycle
Step 1 — Identify the pattern with Bootstrap CUSUM. Apply Bootstrap CUSUM to the event rate series (incidents per month, adverse events per quarter, never events per year). If the process is stable with no change point, individual events are common cause variation — the system is producing them routinely. This tells you the problem is systemic, not episodic. If an upward change point appears, something specific changed and made things worse. Date the change point — that narrows the investigation window.
Step 2 — Identify the root cause with RCA. Use the 5 Whys or fishbone diagram above to trace the causal chain. Apply the Joiner test at the end: is the proposed fix at Level 1 (output), Level 2 (process), or Level 3 (system)? If it is at Level 1 or 2, ask whether a Level 3 cause exists that the analysis has not yet reached.
Step 3 — Implement a Level 3 fix. The fix must address the root cause at the system level. Physical redesign where possible (making the wrong action impossible), structural change where physical redesign is not feasible, economic or accountability mechanism change where structural redesign is not feasible.
Step 4 — Pre-specify the Bootstrap CUSUM test. Before implementing the fix, state in writing: we expect a Bootstrap CUSUM change point in [outcome measure — the event rate series] within [Z] time periods at [Y]% confidence. This is the commitment that makes the verification step meaningful.
Step 5 — Verify with Bootstrap CUSUM. Run Bootstrap CUSUM on the event rate series periodically after the fix. When a downward change point appears at the predicted confidence level, the fix is confirmed. When it does not appear within the expected lag window, the root cause analysis was incomplete — return to Step 2.
Related concepts
This concept sits within a broader framework for understanding why improvement programmes succeed or fail. Start with Why Nothing Changes for the full picture, or go to Start Here for a guided introduction to the method.